

在当前Debian,Redhat这些Linux发行版的天下,Linux 的 BootLoader似乎已经成为一个遥远的概念。当然,如果你喜欢折腾Arch Linux这些需要手动设置Boot顺序的发行版,对Linux的启动流程肯定不会陌生。
近些时日,笔者读了一些关于Linux启动的文章,这篇博客就作为一篇学习笔记,分享一下从Linux0.11内核到现代Linux的启动。
现代Linux的Boot流程
如果你只是想了解现代Linux启动流程,阅读这一部分就足够了。
从PC通电到Linux完全挂载根文件系统运行,我们可以大致把整个流程分为5个部分:
BIOS启动, MBR加载,内核加载,内核启动和初始化。
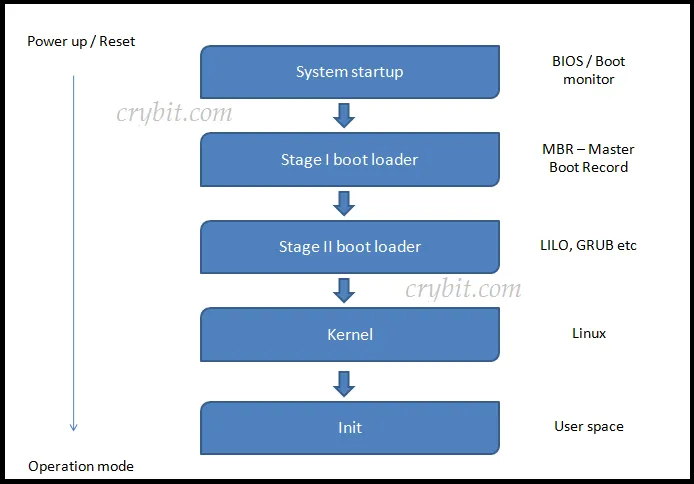
BIOS启动
随着时间推移,UEFI相较于BIOS占据了越来越高的地位。然而,作为一篇学习型的文章,我们在此不会讨论过于前沿的技术,随着IBM PC而流行的BIOS仍然是我们论述的重点。
BIOS预装在主板上(过去常烧录在ROM中,现在则存储在闪存中,便于更新BIOS),在通电时进行硬件初始化和POST硬件自检。POST测试(Power On Self Test)主要是检查一些硬件的读写是否正常。POST 主要不是用来做硬件诊断,它只是检查系统硬件是否存在并且加载一个BootLoader。POST过程中主要有两类错误:
- 致命错误,主要是硬件原因;
- 非致命错误,主要是软件原因。
POST的主要职责包括:
- 检查CPU寄存器
- 检查BIOS代码的完整性
- 检查基本组件如DMA,计时器,中断控制器
- 搜寻,确定系统主存大小
- 初始化BIOS
- 识别,组织,选择出哪些设备是可以启动的
MBR加载
MBR(主引导记录,Master Boot Record)加载,是BootLoader工作的第一阶段。
MBR指的是磁盘上的第一个扇区,它存在于每一个硬盘上。按照C/H/S地址描述,即0柱面0磁头1扇区;按照LBA地址描述即0扇区。
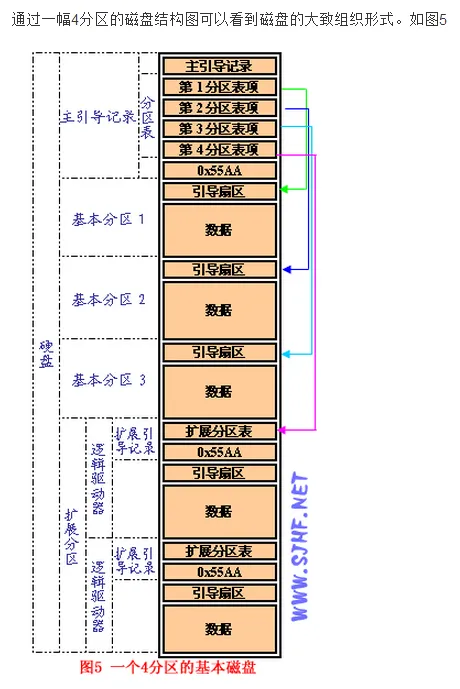
在总共512字节的MBR扇区中,一般由三部分结构组成:
- 主引导程序代码,占446字节
- (可选部分)Windows磁盘标记,在Linux系统下不存在
- 硬盘分区表DPT,占64字节
- 主引导扇区结束标志AA55H
具体分布如下:
| 0000-0088 | Master Boot Record主引导程序 | 主引导程序 |
|---|---|---|
| 0089-01BD | 出错信息数据区 | 数据区 认为是MBR的一部分 |
| 01BE-01CD | 分区项1(16字节) | 分区表 |
| 01CE-01DD | 分区项2(16字节) | |
| 01DE-01ED | 分区项3(16字节) | |
| 01EE-01FD | 分区项4(16字节) | |
| 01FE | 55 | 结束标志 |
| 01FF | AA |
当我们从硬盘开始启动时,BIOS开始加载并执行boot loader里面的代码,MBR容量太小,有时候没法执行完整的boot loader代码,所以启动要转移到另外的阶段进行。这些阶段在不同的boot loader上不一样,是时候转移到boot loader的第二阶段了。
内核加载
也叫内核加载阶段,这个阶段的主要任务是加载Linux 内核。
在早期的Linux0.11中,这个流程通过将bootsect.S和setup.S代码加载到内存中执行。现代Linux支持了多种BootLoader,例如:
- LILO: Linux Loader
- GRUB: Grand Unified Boot Loader
主要使用的是GRUB,因为LILO有些缺点。GRUB的一个好处是它能识别Linux文件系统,GRUB能从格式为ext2/ext3的文件系统中加载内核。除此之外,Linux还可以通过将权限转接给ntldr实现Windows系统的启动。
GRUB会从一个已知的路径加载进来,通常是/boot/grub,同时会把必要的驱动和内核模块加载进来。之后读取该目录下自动生成的grub.conf,按照配置执行这个程序,也就是显示我们经常见到的GRUB菜单。
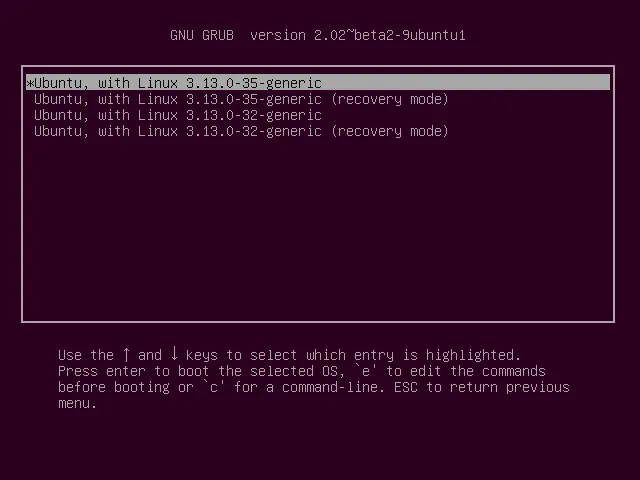
在这里就可以选择我们想要启动的内核咯,当然也可以把权限转接到windows或者BSD的启动程序上。
内核启动
内核镜像是压缩的,我们在/boot下可以找到这个vmlinuz压缩文件。当然如果从源码编译的话,得到的也会是这个vmlinuz文件。
我们可以从GRUB入口选择不同的内核,如果没有选择,GRUB会自动选择默认的那个去加载,我们当然也可以修改默认配置,然后生成新的grub.conf,自动加载内核。
选择的内核会先加载到内存中,然后是加载一个包含基本的根文件系统的镜像文件,最后内核的所有模块都会被加载到内存中。这个镜像文件的位置是/boot,也即我们所知道的initramfs,有的版本被命名为initrd。
initramfs,是”initial RAM file sytem”的简写,它的前身是initrd “initial ramdisk”. 这个镜像文件包含原始的文件系统。GRUB加载内核的时候会告诉内核这个镜像文件的内存地址,然后内核会挂载这个镜像文件到内存中作为Linux的根文件系统。
为什么我们需要这么一个看起来多余的操作?这是一个典型的先有鸡还是先有蛋的问题。加载Linux内核需要根文件系统,而加载根文件系统又需要内核的初始化,为了解决这个奇怪的矛盾,我们可以首先加载一个虚拟的根文件系统initramfs,然后等待真实的根文件系统被加载之后,再将它从内存中剔除。
之后内核会开始检测系统硬件。启动流程开始根据配置启动INIT(SYSTEMD)进程和对应的DAEMONS进程。这些内容会在下一个阶段完成。
内核初始化
内核一但加载到这一步,会自动执行sbin(sbin/init)下面的init程序。[在 RHEL/CENTOS 7中,/sbin/init被链接到 ../lib/systemd/systemd下],当init进程启动,它就成为了你Linux机器的第一个进程,所有的新进程都是init的子进程,所有的孤儿进程都由init进程来回收和管理。
init进程做的第一件事是读取配置文件, /etc/inittab,这会指引init进程去读初始化配置脚本去配置环境、设置PATH,开启swapping,检查文件系统等等。从/etc/inittab里,系统会根据rc文件开启对应的服务。
当然,这里展开的话完全可以写一篇新的博客来讲解,在这里我们有一个大致的了解就可以了。
Linux0.11内核Boot
诶,既然我们连最新的Linux内核的启动流程都了解了,为什么还要来学习Linux0.11这个半成品的版本?
事实上,即使是最新的Linux内核,启动流程的设计上也和最早的Linux有一定的共通之处,而且古早的Linux内核具备更少的源代码,在学习上更加容易理解,也更容易形成工程上的视野。
接下来的解析,需要一定的汇编语言和C语言能力,如果难以理解的话,可以看一些更加简单的解析,这里推荐《Linux内核源码完全注释》。
首先被从MBR中加载到内存里的是bootsect.s部分的代码。在BIOS开始执行启动代码之后,boot引导程序被加载到0x07c0部分,之后移动到0x9000处开始执行。然后system模块会被加载到0x1000处,最大不会超出0x9000部分,然后开始初始化init进程。
我们按顺序看看源码:
bootsect.s
这里定义了所有的地址常量,用于加载和启动内核
SETUPLEN = 4				! nr of setup-sectors
BOOTSEG  = 0x07c0			! original address of boot-sector
INITSEG  = 0x9000			! we move boot here - out of the way
SETUPSEG = 0x9020			! setup starts here
SYSSEG   = 0x1000			! system loaded at 0x10000 (65536).
ENDSEG   = SYSSEG + SYSSIZE		! where to stop loading

! ROOT_DEV:	0x000 - same type of floppy as boot.
!		0x301 - first partition on first drive etc
ROOT_DEV = 0x306
然后会执行真正的启动流程,加载setup:
entry start
start:
	mov	ax,#BOOTSEG
	mov	ds,ax
	mov	ax,#INITSEG
	mov	es,ax
	mov	cx,#256
	sub	si,si
	sub	di,di
	rep
	movw
	jmpi	go,INITSEG
go:	mov	ax,cs
	mov	ds,ax
	mov	es,ax
! put stack at 0x9ff00.
	mov	ss,ax
	mov	sp,#0xFF00		! arbitrary value >>512

! load the setup-sectors directly after the bootblock.
! Note that 'es' is already set up.

load_setup:
	mov	dx,#0x0000		! drive 0, head 0
	mov	cx,#0x0002		! sector 2, track 0
	mov	bx,#0x0200		! address = 512, in INITSEG
	mov	ax,#0x0200+SETUPLEN	! service 2, nr of sectors
	int	0x13			! read it
	jnc	ok_load_setup		! ok - continue
	mov	dx,#0x0000
	mov	ax,#0x0000		! reset the diskette
	int	0x13
	j	load_setup
接下来,成功加载setup后,我们继续把system模块加载进来:
ok_load_setup:

! Get disk drive parameters, specifically nr of sectors/track

	mov	dl,#0x00
	mov	ax,#0x0800		! AH=8 is get drive parameters
	int	0x13
	mov	ch,#0x00
	seg cs
	mov	sectors,cx
	mov	ax,#INITSEG
	mov	es,ax

! Print some inane message

	mov	ah,#0x03		! read cursor pos
	xor	bh,bh
	int	0x10

	mov	cx,#24
	mov	bx,#0x0007		! page 0, attribute 7 (normal)
	mov	bp,#msg1
	mov	ax,#0x1301		! write string, move cursor
	int	0x10

! ok, we've written the message, now
! we want to load the system (at 0x10000)

	mov	ax,#SYSSEG
	mov	es,ax		! segment of 0x010000
	call	read_it
	call	kill_motor
这段代码会打印”Loading…”到界面上,在完成了所有的准备工作之后,我们跳转到SETUPSEG的内存处,控制权转接到setup.
setup.s
setup程序会完成很多实模式的初始化。
entry start
start:

! ok, the read went well so we get current cursor position and save it for
! posterity.

	mov	ax,#INITSEG	! this is done in bootsect already, but...
	mov	ds,ax
	mov	ah,#0x03	! read cursor pos
	xor	bh,bh
	int	0x10		! save it in known place, con_init fetches
	mov	[0],dx		! it from 0x90000.

! Get memory size (extended mem, kB)

	mov	ah,#0x88
	int	0x15
	mov	[2],ax

! Get video-card data:

	mov	ah,#0x0f
	int	0x10
	mov	[4],bx		! bh = display page
	mov	[6],ax		! al = video mode, ah = window width

! check for EGA/VGA and some config parameters

	mov	ah,#0x12
	mov	bl,#0x10
	int	0x10
	mov	[8],ax
	mov	[10],bx
	mov	[12],cx

! Get hd0 data

	mov	ax,#0x0000
	mov	ds,ax
	lds	si,[4*0x41]
	mov	ax,#INITSEG
	mov	es,ax
	mov	di,#0x0080
	mov	cx,#0x10
	rep
	movsb

! Get hd1 data

	mov	ax,#0x0000
	mov	ds,ax
	lds	si,[4*0x46]
	mov	ax,#INITSEG
	mov	es,ax
	mov	di,#0x0090
	mov	cx,#0x10
	rep
	movsb

! Check that there IS a hd1 :-)

	mov	ax,#0x01500
	mov	dl,#0x81
	int	0x13
	jc	no_disk1
	cmp	ah,#3
	je	is_disk1
no_disk1:
	mov	ax,#INITSEG
	mov	es,ax
	mov	di,#0x0090
	mov	cx,#0x10
	mov	ax,#0x00
	rep
	stosb
is_disk1:

! now we want to move to protected mode ...

	cli			! no interrupts allowed !

! first we move the system to it's rightful place

	mov	ax,#0x0000
	cld			! 'direction'=0, movs moves forward
setup.s部分的代码会首先检测所有的硬件,在完成检测之后,将0x1000处的system移动到0x0000,准备从当前的实模式进入保护模式。
接下来,通过head.s把idt,gdt在堆栈中设置为默认值,同时一些其他内容也会在这个部分设置,例如中断。
is_disk1:

! now we want to move to protected mode ...

	cli			! no interrupts allowed !

! first we move the system to it's rightful place

	mov	ax,#0x0000
	cld			! 'direction'=0, movs moves forward
do_move:
	mov	es,ax		! destination segment
	add	ax,#0x1000
	cmp	ax,#0x9000
	jz	end_move
	mov	ds,ax		! source segment
	sub	di,di
	sub	si,si
	mov 	cx,#0x8000
	rep
	movsw
	jmp	do_move

! then we load the segment descriptors

end_move:
	mov	ax,#SETUPSEG	! right, forgot this at first. didn't work :-)
	mov	ds,ax
	lidt	idt_48		! load idt with 0,0
	lgdt	gdt_48		! load gdt with whatever appropriate

! that was painless, now we enable A20

	call	empty_8042
	mov	al,#0xD1		! command write
	out	#0x64,al
	call	empty_8042
	mov	al,#0xDF		! A20 on
	out	#0x60,al
	call	empty_8042
接下来是设置部分必须的中断:
	mov	al,#0x11		! initialization sequence
	out	#0x20,al		! send it to 8259A-1
	.word	0x00eb,0x00eb		! jmp $+2, jmp $+2
	out	#0xA0,al		! and to 8259A-2
	.word	0x00eb,0x00eb
	mov	al,#0x20		! start of hardware int's (0x20)
	out	#0x21,al
	.word	0x00eb,0x00eb
	mov	al,#0x28		! start of hardware int's 2 (0x28)
	out	#0xA1,al
	.word	0x00eb,0x00eb
	mov	al,#0x04		! 8259-1 is master
	out	#0x21,al
	.word	0x00eb,0x00eb
	mov	al,#0x02		! 8259-2 is slave
	out	#0xA1,al
	.word	0x00eb,0x00eb
	mov	al,#0x01		! 8086 mode for both
	out	#0x21,al
	.word	0x00eb,0x00eb
	out	#0xA1,al
	.word	0x00eb,0x00eb
	mov	al,#0xFF		! mask off all interrupts for now
	out	#0x21,al
	.word	0x00eb,0x00eb
	out	#0xA1,al
最后,我们会真正地跳转到保护模式,运行Linux在内核部分的启动和初始化:
	mov	ax,#0x0001	! protected mode (PE) bit
	lmsw	ax		! This is it!
	jmpi	0,8		! jmp offset 0 of segment 8 (cs)
在此之后,控制权便真正地转接到了main函数。
main.c
main函数首先设置内存的布局,然后便开始执行一系列的初始化:
void main(void) /* This really IS void, no error here. */
{               /* The startup routine assumes (well, ...) this */
  /*
   * Interrupts are still disabled. Do necessary setups, then
   * enable them
   */
  ROOT_DEV = ORIG_ROOT_DEV;
  drive_info = DRIVE_INFO;
  // 计算实际物理内存大小:
  memory_end = (1 << 20) + (EXT_MEM_K << 10);
  memory_end &= 0xfffff000; // 对齐到kb,使用一个4GB的mask来取KB之后的内存地址
  // 限制内存大小不超过16MB
  if (memory_end > 16 * 1024 * 1024)
    memory_end = 16 * 1024 * 1024;
  // 根据内存大小,设定缓冲区
  if (memory_end > 12 * 1024 * 1024)
    buffer_memory_end = 4 * 1024 * 1024;
  else if (memory_end > 6 * 1024 * 1024)
    buffer_memory_end = 2 * 1024 * 1024;
  else
    buffer_memory_end = 1 * 1024 * 1024;
  // 主存起始地址 = 缓冲区结束地址
  main_memory_start = buffer_memory_end;
  // 最终的内存布局类似:
  // +------------------+ 0x1000000 (16MB)
  // |                  |
  // |   主内存区        |
  // |                  |
  // +------------------+ main_memory_start
  // |                  |
  // |   缓冲区          |
  // |                  |
  // +------------------+ 0x100000 (1MB)
  // |   系统ROM/BIOS    |
  // |   及其他          |
  // +------------------+ 0x0
#ifdef RAMDISK
  main_memory_start += rd_init(main_memory_start, RAMDISK * 1024);
#endif
  mem_init(main_memory_start, memory_end);
  trap_init();
  blk_dev_init();
  chr_dev_init();
  tty_init();
  time_init();
  sched_init();
  buffer_init(buffer_memory_end);
  hd_init();
  floppy_init();
最后,main函数陷入内核空间中的进程0,然后移动到用户空间,复制一份用户空间的进程1作为init进程后,结束初始化的所有任务。
  sti();
  move_to_user_mode();
  if (!fork()) { /* we count on this going ok */
    init();
  }
  /*
   *   NOTE!!   For any other task 'pause()' would mean we have to get a
   * signal to awaken, but task0 is the sole exception (see 'schedule()')
   * as task 0 gets activated at every idle moment (when no other tasks
   * can run). For task0 'pause()' just means we go check if some other
   * task can run, and if not we return here.
   */
  for (;;)
    pause();